Saturday, August 21, 2021

Otto Long Arm – Bestiarum Miniatures


I remember a time when I would get excited about new releases by Citadel Miniatures.  This faded as GW largely moved away from the sort of things that interest me, but every now and then I find a new range or miniature creator that rekindle that excitement.  One of those I have discovered recently are the models by Bestiarum Miniatures.


I don’t know much about the background of the world of Bestiarum, but they create some of the most characterful, crazy, dark and sometimes disturbing models I have seen for some time.  The only problem is they don’t produce ‘physical’ miniatures. but sell their ranges as files for 3D printers.  Now, I am a luddite and most technology is beyond me so 3D printing is a mechanical sorcery that frankly terrifies me!  Thank goodness for places like Etsy and eBay where licensed sellers can be found, sometimes providing this type of mini at a reasonable price.


Otto Long Arm is the first Bestiarum mini I have purchased.  I’m going to be sensible this time and only buy new ones as the last model is finished… that also encourages me to paint them faster.


And I need that encouragement.  This is the first model I have finished in over 18 months.


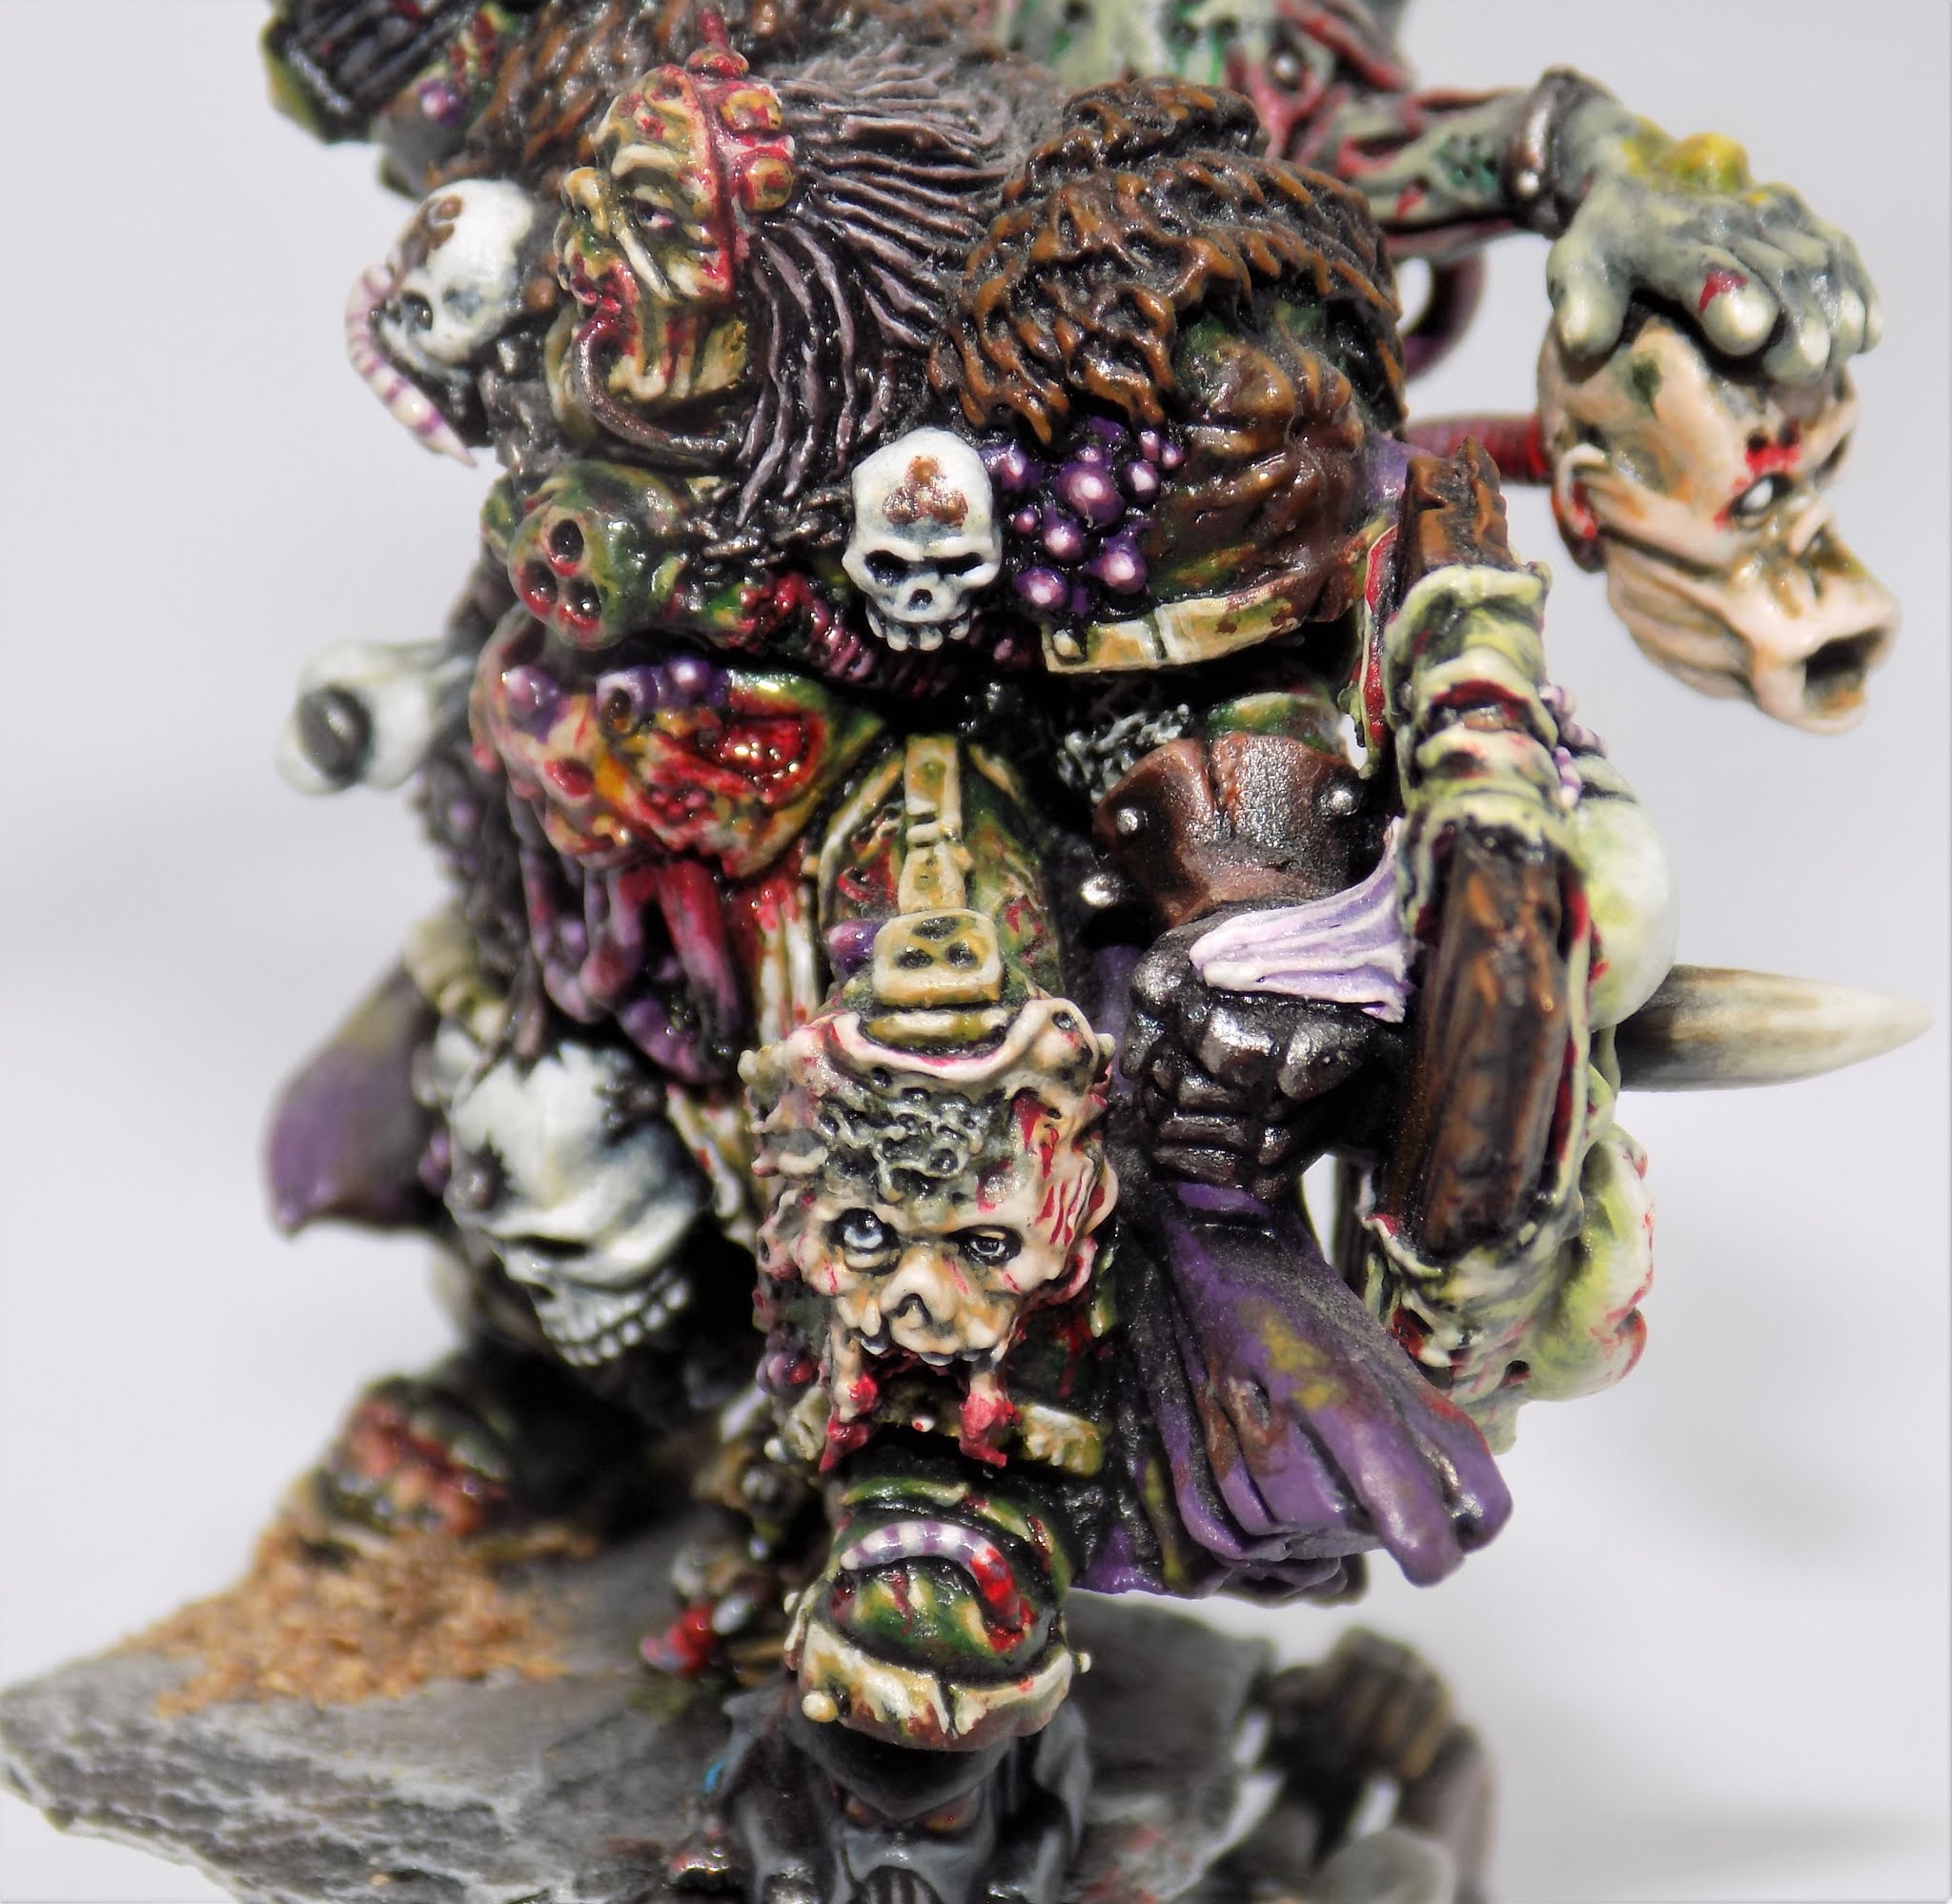
But what a model.  Very little cleaning was required, I wasn’t tempted to convert him… just a wash, build and undercoat (White over grey over black).  The colour scheme was rather guided by the helmet, which I though was similar to a Roman Gladiator – a bit of research meant that Otto here was going to be in armour which was partly gold / bronze colour and there would be some red areas.


 Otto might once have been great, but I figured he had spent some time on some crusade in this hellish underworld – his clothing is tatty, he has bandages and damaged armour.  He’s not been able to repair what he set out with, and has picked up replacements where possible – this meant a lot of his armour would be a more conventional iron colour with plenty of rust.


I started on the inside and worked outwards, so the clothing and rags came first… earthy, dull colours, largely using Vallejo paints.   Then the metal, also Vallejos with plenty of rust created using sepia ink, Modelmates’ Rust Effect paint and a little GW Ryza Rust.  I painted all of the metal shield at this point as I wanted lots of damage and chipped paint – painting all of the metal now didn’t take much longer and gave me more freedom when it came to painting the design.


The shield was painted a Gladiator-esque red with plenty of battle damage – let’s face it, Otto is a skilled warrior and most of the time the enemy’s blows should be landing on his shield!  Then came the design; I knew enough that in the Bestiarum world Otto’s enemies are called the ‘Corrupted Ambrosia’, so I figured that Otto’s symbol would be a (non-corrupted) Ambrosia pattern.  A little Google research showed that Ambrosia has an astrological sign, a bit like the infinity symbol with the top missing… perfect!  This was added to the shield, but I wanted the symbol to be fading, broken, a symbol of Otto’s sanity and resolve.  One day, after more battles, the symbol will be gone and Otto will succumb to the corruption.


(I think I’ve mentioned before that creating a backstory for your model - which grows as you work on it - helps you to add character to your creation as you look to convey it with the paint)


The remaining armour was painted in the gold/bronze colour (GW paints this time) and as a further nod to the Roman Gladiator I only painted in this colour those armour pieces that would have been worn by a Murmillo – right arm and shoulder, knee, helmet and edge of the shield.  Again you can see the armour is tainted by the environment.


 The only two items that are not damaged, worn or corroding are the two relics tied to Otto’s belt.  These represent his courage and strength so are bright, with some green spot colour.  More vibrant than the rest these embody the glimmer of hope that our brave warrior will prevail.


Normally my bases would use fine sand or mud, but this I went for coarser tiny stones.  Otto is in a brutal environment, not the sort of place you’d go barefoot, so I used something grittier to make it seem that he was walking on a surface that felt like lego blocks.  Nasty.  Pale and ashen with a few stone slabs and bony spikes (balsa and cocktail sticks for a bit of texture) plus a couple of skulls and some anaemic looking grass - you’d not want to stay there long.  When painting the base I also drybrush some of the colour onto the feet of the model… far too often do you see models with strangely clean shoes!


Not really my finest work but a nice start after such a long break.  I enjoyed painting this model so much I’ve picked up a bit of the painting bug again…  The next Bestiarum mini is already on order…


I hope you find these blogs useful – there are many other pages and sites that tell you what paints to use and describe the techniques to get the colour on the model.  I want mine to be a bit different, to describe the thought processes and background of the creation of my artwork.  If it helps you to think a bit differently as you build and paint and enables you to improve your work, then all the better 😊


Thanks for reading... thoughts, tips, questions and comments are welcomed!

Sunday, July 25, 2021

The Deceiver – Golden Demon UK 40K Monster Silver, 2002

Once upon a time the Golden Demons were a special event, held but once a year.  They were at the end of September, which meant late summer for me was a rush of endless painting to get everything done – usually the end of the debauchery of Reading Festival meant time to ‘knuckle down’.  Like many other GD winners I had always left it too late and was painting until 5am the morning of Games Day.

2002 was different.  I had actually managed to complete the intended projects early, and had a day and a half spare.  Was I going to rest up and take it easy before Games Day?  Nope!  I proudly declared to my housemate Dave (Palmer, GW Reading Overlord) that I was going to paint another entry in time for the event!  He scoffed, called me something mildly offensive and got on with his computer game.  I was determined to prove him wrong.  My Deceiver (for my Necron army that never got past 10 or so models) had already been built, so I was going to paint it…  In a day and a half <Note – at the time a model was taking me 6-7 weeks on average>.

 GW's original Deceiver:


I had always had the idea of the C’Tan emerging from some portal, rather than the original pose which I felt was fairly static in comparison.  The conversion was probably more simple than it appears – most of the work was done by bending the ‘robes’ so he appeared to be moving forwards.  The pointing right arm was repositioned keeping it parallel with the right leg to give more of the impression of forward motion, with the fingers removed and replaced as a fist.  The left hand was given some sculpted flames to balance the model out a bit and the arm repositioned to again follow the lines of the body, as was the head.


Our joyful alien friend was undercoated black and painted exclusively in GW paints.  GW painted their version gold, and I liked the metallic look for him (especially as he was part of the Necron army) but thought dark silver would suit the model better, especially with what I had planned, allowing the colours and stars to stand out from the darkness more.  Plus silver is relatively quick and simple to paint, especially since I only really painted highlights on this one.  I used metallic paints – I am not a fan at all of the Non-Metallic Metal style – there are perfectly good metallic paints so why not use them?  Plus I prefer my metals to look grim and dark; not every surface needs to be gleaming to a mirror shine!


After the skin it was mostly the detail left.  I painted all of the skin so I could choose later where to place the lozenges.  The lozenge pattern was a lot simpler than it looks; I painted the pattern in thin white first (so some of the shading showed through), one lozenge at a time, then randomly coloured them in, following the shading I had already painted on the skin.  I wanted them to appear radiating and falling and fading away from the body, so I painted the first lozenge in the centre of the chest and used that as a central point.  I then painted a number round the body and tops of the legs, following which I painted the patterns in lines in different directions round the body, some growing bigger and fading, others growing smaller and disappearing.


The ‘cloth’ was given a faint grey highlight, again so the stars would stand out better.  They were painted in a variety of colours (not all stars in the sky appear white!) starting as little dots nearer the body, growing in size and complexity, with a few nebulae, as they moved closer to the base.  After that some green spot colour, a simple base so as not to detract from the portal to deep space in the centre of the base, and that was it!


A matt varnish followed by a gloss varnish gave him a bit more shine.  I didn’t sleep the night before Games Day, but I did finish this fella in time.  A record for any model, let alone one this size!


I didn’t expect much from this model at the Demons.  I had painted him simply to challenge myself to see if I could finish him in time, and I knew how relatively simple it had been to paint.  Imagine my surprise when he picked up a Silver in the category (it had to be, for this metallic monster!  Then again, maybe I should have painted him gold after all?).  He came second to Matt Parkes’ Ork Warboss Ghazghkull Thraka - which went on to pick up the Slayer Sword - so who would I be to complain?  Interestingly Karsten Radzinski picked up bronze with another C’tan conversion, far more complex than mine!

You can see the winners here:
http://demonwinner.free.fr/uk/2002/golden_demon_winner.php?categorie=4


I even got my photo in the 2003 GW event programme!


My hair is also silver these days…


Thanks for reading... thoughts, tips, questions and comments are welcomed :)

Saturday, July 17, 2021

Rat Ogre - 2015


For me the GW Skaven Stormfiends were an example of the ‘creep’ of Warhammer towards 40K, which finally culminated in the ‘40K lite’ Age of Sigmar – all those sci-fi-esque weapons, mind controlling brain rats and so on just didn’t work with the way I see the Warhammer World.  They did get me thinking about creating a monster that showed the pinnacle of some crazed Clan Moulder experiment... which is how this Rat Ogre was born.


Stormfiends:                                                


Not a Stormfiend:


The idea of a huge armoured Rat Ogre was interesting enough, but I started thinking about a crossbreed with some other creature to make it even more imposing, and quickly settled on a porcupine.  I mean, a giant rodent Ogre encased in armour is one thing, but one covered with spines?  Imagine meeting that down some dark sewer! 

I started to experiment with bitz and blu-tac using a Stormfiend as the base model.  None of the arms worked for me, so I whipped some off a Rat Ogre from the Island of Blood set.  The pose of the upper body and arms looked a little odd, as if this beast was just flexing his muscles, so the addition of a weapon made the arms look more natural.  The model was beginning to look like he fulfilled some sort of armoured guard role, so a halberd seemed right, with a huge metal ball at the other end to make it look a bit more balanced.

 The build took almost as long as the paint job!  Because of the way it had to be built and sculpted I wasn’t able to paint it in smaller sections, so it was completely built then painted.  I added a few armour plates and blades from the Stormfiend set, but all of the spines were from my bitz box or carved from plastic rod.  The spines were the last to be added so that they could be positioned in a way that flowed more naturally with the pose of the Ogre.  I also had to position them in such a way that they would not get caught in tunnels, so the natural spines point behind the model… he’s not able to walk backwards down tunnels though!


Where possible I use bitz rather than sculpting new things with Green Stuff (mainly out of laziness!), but a lot of hair was sculpted to cover gaps and holes, as well as to sculpt those areas where the spines had ‘punched’ through the armour.


Undercoated black with spray highlights of grey then white (I’m too much of a luddite for an airbrush) this was painted with Vallejo paints for the more earthy colours, while the colourful areas (red, blue, etc) were GW paints.  I also like to do my washes with the pretty good GW Shades range rather than inks.


When deciding in which order to paint I would always advocate starting on the inside and working out… skin, then hair, then clothing, then armour, then weapons, then base.  It means you are less likely to get paint on something you’ve already done, but also makes it easier to cover up any mistakes.  This model was slightly different in that it is hunched over, so the ‘inside’ was also the front of the torso and I had to account for the belt, belly, etc when determining order of painting. 


 I don’t paint blue very often, and thought it would make a nice colour for the armour in contrast to the big areas of skin and hair, as well as looking nice next to the ivory coloured spines.  The armour was always going to be rusty and scratched, but when doing this I prefer to paint the area up as if it is fairly new and clean, then add the dirt and rust and damage – it means I don’t have to commit to the areas of damage early on.  When adding damage it is important to think about how the model moves and fights and where damage might naturally occur; edges and corners are more likely to be scraped and worn than the centre of armour plates which may be more likely to be scratched and dented.   This big fella moves down tunnels so is bound to have lots of paint worn off the edges of the pauldrons (shoulders)  and vambraces (lower arms).  Enemies are more likely to be in front of him – you’d never squeeze past him in a tunnel - so there should be less battle damage at the back!  To get the damage effect the areas were painted first with a terracotta/ orange mix then silver, then I went back and painted little blue highlights to show the edges of the chipped paint.


Little areas of red add a nice spot colour and I think the paint scheme flows nicely through the red, purple and blue spectrums.


As ever while building and painting the model I was thinking of the overall ‘story’ of the model.  The original Stormfiend had one foot on a rock (which GW seems to love almost as much as they do models jumping off rocks!), but my model was in some subterranean vignette – I came up with the idea of him in a two-level sewer or similar.  Which meant I had to find him a two-level sewer or similar!  Unable to locate anything to suit my needs I ended up building him one with little bricks I purchased online, made of hard plaster or similar.  Each brick was painstakingly weathered at the edges and glued in place, a long slog but definitely worth it, especially when I was able to add a little drain cover!


As I worked on the model I realised that there would be a big open space at the front of the base.  Never a fan of a big open space on a model I added some rats, emerging from the sewers, emboldened by their giant friend!  They were painted in dark colours so as not to detract from the Ogre, but certainly something that would reward the person who took a bit of time to look at the piece!     


This model was entered into the Golden Demons Competition in 2015 and was one of the last I entered before retiring from the Demons due to the time constraints of work and family.  It didn’t make it into the second round of the competition.


The following year I went to Salute in London and took this fella along – he was a finalist in the peer-judged Salute Painting Competition, of which I am very proud.  I love this big spiky rat fella 😉
You can see some of the other entries here: https://www.beastsofwar.com/eventslist/salute-2016-painting-competition/ (apparently my model looks wicked!)


Thanks for reading... thoughts, tips, questions and comments are welcomed :)


Thursday, May 13, 2021

Chaos Lord of Nurgle – Golden Demon UK 40K Single Miniature Gold, 2001


 Back in the day I was a sucker for an interesting wager.  One evening in 2001 I was out at the Purple Turtle Bar in Reading when one of the GW gang (Dave Palmer I think) bet me that I couldn’t win a Golden Demon award using a component from a non-Games Workshop model.  Use of non-GW components would result in disqualification… so I would have to be subtle.  The result was this 40K Chaos Space Marine Lord of Nurgle.


 It  was only when I had a good look at the model today to write this blog entry that I realised how much converting went into this mini.  It was based on a metal 40K Chaos Space Marine Lord but I don’t think there is a millimetre that has not been modified, added to or converted in some way.  I had really got to grips with Green Stuff at the time, so went crazy with that and bitz from my bitz box.


In addition to the metal model and lots of Green Stuff, this model was made up of plastic bitz, slate, wire, paper, metal rod and ubiquitous Nurglings.

  It was painted mostly with GW paints with some Tamiya Clear colours – red, green and yellow, sometimes mixed – still a staple of any decent painting kit.


I have always been more of a fan of Warhammer than 40K, and wanted this fella to have some archaic style weapons.  An axe and shield seemed right, but it took me a long time to figure out how to make them look interesting.  The axe is actually a small piece of the same slate I used for the base, embedded in a piece of flesh stuck to a long bone – pretty Nurgly I reckon.  The shield is wooden with stretched skin and three buboes in the Nurgle symbol, one of which has burst just in case there was any doubt as to which deity this Lord follows!


The armour might not be all that functional any more, only serving to hold the Champion together!  It’s failed in areas; the stomach has burst out and split, with some tasty Green stuff entrails.  It’s covered with cuts, gaps and zits, and I carved one foot into exposed toes.  There are no pipes – all have been painted as guts.  One shoulder pad has spines sticking out, the other has… well… a dirty old sphincter.


The backpack.  Oh that backpack.  I hope it’s not a reflection of my state of mind at the time, but creating backpack out of body parts just seemed to suit the character… There are a few themes in this model that have carried through to many of my later creations, which hopefully you’ll be able to spot as I share more.  The standard is based upon the first ever Nurgle banner I painted (sadly long gone) and the tongue has continued to feature, as has the burst bubo shield.


I’ve not had a good look at this model for so long, and it’s a joy picking out all the little conversions, from the bone handle of the sidearm to the wiring feeding the flayed face this model is wearing.  The painting is quite messy and a bit retro (like the Champion himself!), certainly not nearly good enough by today’s competition standards, but I think it’s the modelling and detail that make this one stand out.


This ghastly creation picked up Gold in the 40K Single Miniature category in 2001.  That same year I won the Slayer Sword with my Slaanesh Warband.  Interestingly when I went up to Lenton to have photos taken of the models, GW had no idea which was the Slayer Winner… apparently the judges couldn’t really decide between whether the Chaos Lord or the Warband should win, but both were mine!  I chose the Warband in the end, simply because it took longer, so that’s what went in the publications.  To be honest I’d be happy for this to have won.


And for the non-GW component?  I’m not telling… but if you can pick it out and identify please comment below.  You might win a prize.  Which reminds me, I’m still owed a tenner from that bet…


Thanks for reading... thoughts, tips, questions and comments are welcomed :)


Saturday, April 24, 2021

Drunk Halfling Sentry


 If looking for a miniature that tells a story, you could do a lot worse than the Citadel C11 Halflings from back in 1988.  I think the first miniature I ever painted was from this range, using poster paints – I repainted that model again more recently, it looked a bit better this time.   These are super little models, each with so much character!

Have a look at the range here, courtesy of Stuff of Legends: http://www.solegends.com/citc/c011halflings/index.htm


This fella was named ‘Hero’ when he was released.  I didn’t give him a name… it would probably be something like ‘Tiddler the Tipsy’, but he isn’t much of a hero when he is almost unconscious, propped up against his spear.  I never felt the need to convert him, he is a perfect miniature.


A joy to paint, using Vallejos for the earthy colours (browns, creams, wood, etc) because they have a far broader range than GW.  I do use GW paints for colours such as red and blue as I think they have stronger pigment and hold the colour better… saying that the Vallejo greens are very good!  The red and green colouring is to represent the colours of apples, one of which is on the base.


Don’t forget the little things like fingernails, eyebrows, etc.  They might not stand out, but it’s the little details that people will spot – that’s what makes the difference between winning models in the competitions.


You might notice that I still use metallic paints.  I’m not a fan of NMM, it just doesn’t appeal… there are so many good metallic paints out there why not use them?


Talking of detail this fella is so tipsy he is spilling his scrumpy – the cider was made by patiently heating clear plastic rod over a candle and when it starts to melt pulling it to the required thickness.  Please be careful - don’t hold the plastic too close or it will burn, and don’t set fire to anything.  A little tea light is best.  Once I had extruded the plastic a small length was glued in place between the mug and base, with layers of clear PVA painted over to the required thickness and also to cover over the ‘joins’.  A couple of layers of yellow ink mixed with gloss varnish completed that.


Because I had made no changes to the model I felt the need to assuage my OCD by adding more to the base.  Lots of little grass, leaves, plants and flowers from a variety of sources, plus the apple!  This was made from green stuff with a wire stalk – at least one is added to each Halfling I paint, to the extent that I have started a Halfling warband, the Scrumpton Militia (using the sublime Sabre Miniatures models) whose imagery is based around apples and the orchards they guard… more of them another day!


Not much to say about this fella really!  A simple model with a simple paint job… but I think he is great, I hope you like him too 😊


 Thanks for reading... thoughts, tips, questions and comments are welcomed :)


P.S. Do you want to avoid paying full price for GW models?  Looking for a friendly independent model store that is also great value?  Visit my friends at the Cryptic Cabin: www.crypticcabin.com .  They also have a lovely little store in Wokingham...


Otto Long Arm – Bestiarum Miniatures

I remember a time when I would get excited about new releases by Citadel Miniatures.   This faded as GW largely moved away from the sort of ...